

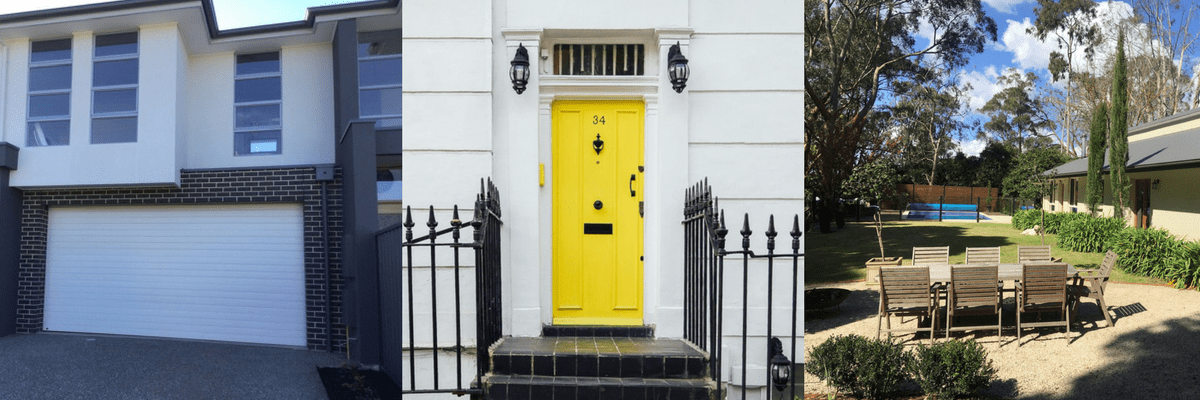
It is time to sell your home? Making the decision to sell your home can be tough and the whole process can be daunting if you have never done it before.
It is said that your principle place of residence is possibly your biggest asset, so with that in mind, it is vital that you put the best version of your property on the market.Selling your home can become a messy process as you understand that there might be more involved than first expected.
We have created this easy to follow guide to help you through every step of the way.
It is as simple as following from Step 1 to 12 and working through each section. The first six steps are primarily organisation based so that you can lay a solid work plan before diving in and getting lost. The final six are the ‘doing’ steps where you’ll get your hands dirty and really see your home transform.
The 12 Step Process for Getting Your Home Ready for Sale
Easily browse this guide by chapters. Click any of the links below to jump to the chapter you want to read.

Your first step in getting your home ready for sale is to get yourself in the right frame of mind – think like a buyer! Here’s how you do it.
1. Go To Open Inspections
A great way to get into an objective state of mind is to actually attend open house inspections. It doesn’t take long to drop into open viewings on the weekend and take note of what stands out, either positively or negatively.
Note how the rooms have been styled, ask yourself if you would or wouldn’t live there and think about what makes the property attractive. Even better, bring a friend, family member or partner to the viewing and ask for their opinions. You will be surprised at what you notice that deters or excites you about the property.
2. Write Down What You Like / Don’t Like
We strongly suggest physically noting these points down so you can review when you arrive back at home or refer back to later.
If you can, stay in your local area so you can get a feel for what else is on the market already. Chatting to the agent and other viewers will also help you to understand potential buyers in the community. This is a great exercise, as it will allow you to view your own home through the eyes of a potential buyer when prepping for sale.
3. Check Out Real Estate Websites
Don’t want to drop into local open inspections? Take a look at real estate websites and see what’s in the area.
Once again, take note of the interior styling, landscaping and what is highlighted about the property.
Real Estate Websites:

The second step in getting your home ready for sale is to ensure you get rid of all those negative emotions about selling your house! Here’s a few tips on how to handle this challenging period.
So, you have made the decision to sell your home, it may take a little time to process the emotional impact it may have on you. It’s only natural to form an attachment to your dwelling; many of us have raised children, celebrate happy times, and treated it as our sanctuary.
Just remember, you will create new memories in your next dwelling and by keeping your current place in pristine condition, you are paving the way for new people to enjoy this space.

1. Understand that you may feel sad or stressed during this time.
Some days you may feel great and other days you may be reminiscing. Either way, ride the rollercoaster because the reward at the end will be worth it.
2. When it comes to selling, try think of it as a business deal and selling a house rather than your home.
Consider it a product that is going on the market.
3. Focus on the priorities and to do lists (more information below).
Prepare each day with a course of action. Whether it’s a weekend or a weekday, set a small goal that gets you one step closer to the end goal.

Don’t try and do it all yourself, the third step in getting your home ready for sale is to ask people who’ve done it before.
1. Seek the advice from friends and family about their selling experiences.
We live in a world where much information is at our fingertips about most facets of our lives. Do your own research based on others stories about getting your home ready for sale. There are even chat groups and forums on the Internet. Seek as much information as you can to make an informed decision that is right for you every step of the way.
There is a lot to keep in mind, like what time of year you are selling, which real estate agent to use, how long it generally takes to prepare a home and the best, local tradespeople to help you.
The point of all of this research is to avoid making the same mistakes as others and increases your chances of getting the desired price for your home.
2. Questions to ask your friends / family:
- What did you wish you knew before you sold your house?
- How could you have prepared your house better?
- Do you recommend any labourers or tradespeople?
- Were there any unplanned mishaps or surprises?

The fourth step is dedicated to documenting the jobs and repairs that need to be done. This will continue to be a handy point of visual reference to keep you on track.
1. Take photos of all things around your property that are in need of repair.
Whip out your iPhone and getting snapping! Be ruthless during this process, take photos of everything that has been bugging you for the last little while and record how long you anticipate them to be repaired.
Try look at every aspect of the house, top to bottom as if you were the purchaser. If you need, get a friend or family member to help point out repairs or damages. Sometimes it helps getting an extra pair of eyes. Start at one area of the house and don’t leave until you have thoroughly examined it.
 What to look for:
 What to look for:
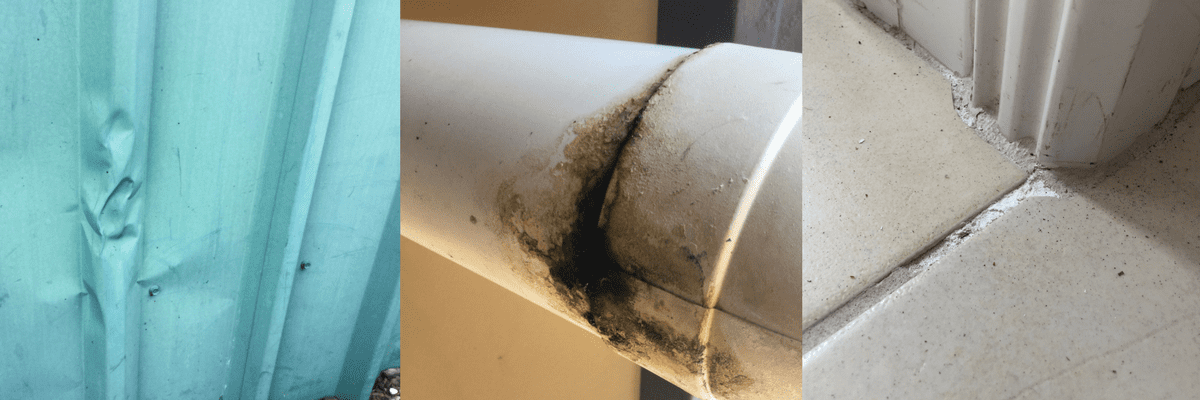
Outside of the home
- Damaged gutters or pipes. Do downpipes flow into a nearby stormwater drain?
- The water pressure in outdoor taps
- Holes in lawn or garden
- Damages in carport or garage
- Corrosion or erosion
- Chipped or peeling paint
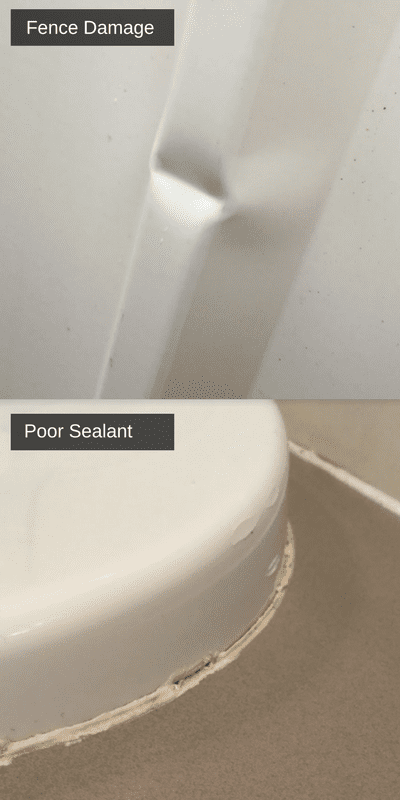
- Fencing damages
Inside the home
- Wood for pest damage
- Dry rot
- Leaky taps
- Visible signs of asbestos problems
- Broken smoke alarms
- Chipped or peeling paint
- Carpet or wall stains
- Cracks in walls
- Dampness (especially on walls shared with a bathroom, laundry or kitchen)
- Broken windows, blinds or doors
- Peeling or damp wallpaper
- Check ceilings for mould or sagging
- Mould on tiles

This step will help you stay on track so that your home is ready to sell as soon as possible. Not sure what to prioritise? Read ahead for more information.
1. Organise your images according to priority
Break your repairs into ‘jobs that can be done in an hour’, ‘repairs that take a day’ and ‘time-consuming repairs’. That way you know straight away what to do if you have a lot or a little amount of time.
Try to finish a job from start to finish, not only is it emotionally rewarding, it’s one less thing to think about.
It’s a good idea to start with the most tedious or time-consuming repairs that need to be done, as often we can tend to leave the hard things until last and in the real estate game, this can cost you more in lost dollars at sale time than time saved by not doing anything.
Your top priorities for making repairs to your house and property should be:
1. Anything that is time consuming, more expensive or requires a professional. If you have watched any renovation or house flipping television show, you would know that things don’t always go to plan and surprises can pop up at any time!
2. If your garden is looking a little drab, consider moving landscaping towards the top of your priorities. This will give the plants a little more time to grow and look more natural and settled.
3. Next, focus on the repairs that only need to be done once.
TIP: Leave painting until the end so you don’t run the risk of staining or damaging walls while you are still living in your home.

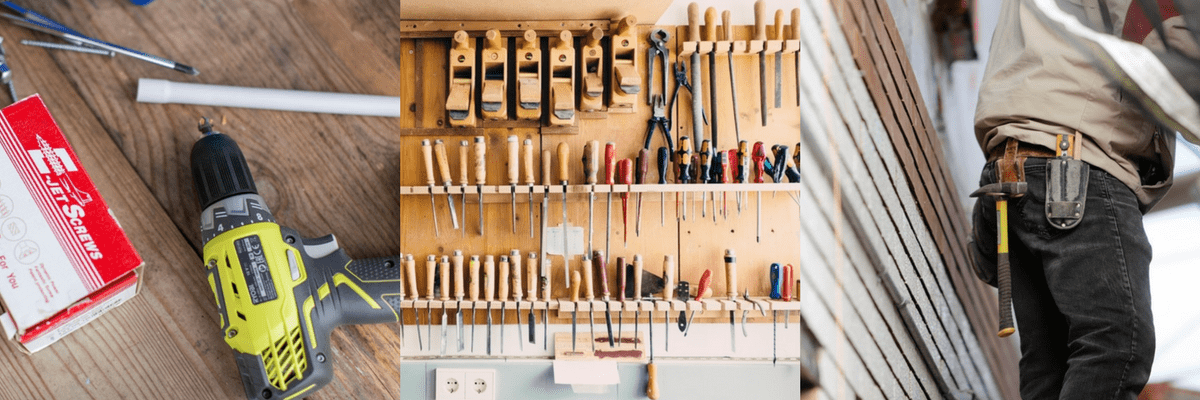
Step 6 focuses on determining exactly what you can do and what you may need help with. Don’t fall into the trap of thinking you can do everything.
1. Determine your skills and how much time you have
Once you have your list of priorities and photos taken care of, write down what you can do yourself in your own time and what you will need help with. Try not to skimp out by over committing yourself to save a few dollars here.
When prepping your house for sale, time is of the essence so where you may have to spend a few extra dollars, what you save on time will make you more money in the long run.
2. Divide your priorities into what you will do and what an expert will do
We have put together a list of what we suggest you do and what you get a professional in for. Depending on your skill level and the repairs, you may need a hand with most things or not much at all.
Repairs You Can Do Yourself |
How to Do The Repairs |
| Paint touch ups | Tricks for touching up walls |
| Weeding | How to get rid of weeds with no chemicals |
| Clearing and cleaning | Creative ways to de-clutter |
| Lawn maintenance | How to maintain a lawn |
| Changing light bulbs | Video – How to change a lightbulb |
| Cleaning windows and mirrors | Clean glass with newspaper |
| Remove wallpaper | The best way to remove wallpaper |
| Replace skirting boards | How to fit and replace skirting boards |
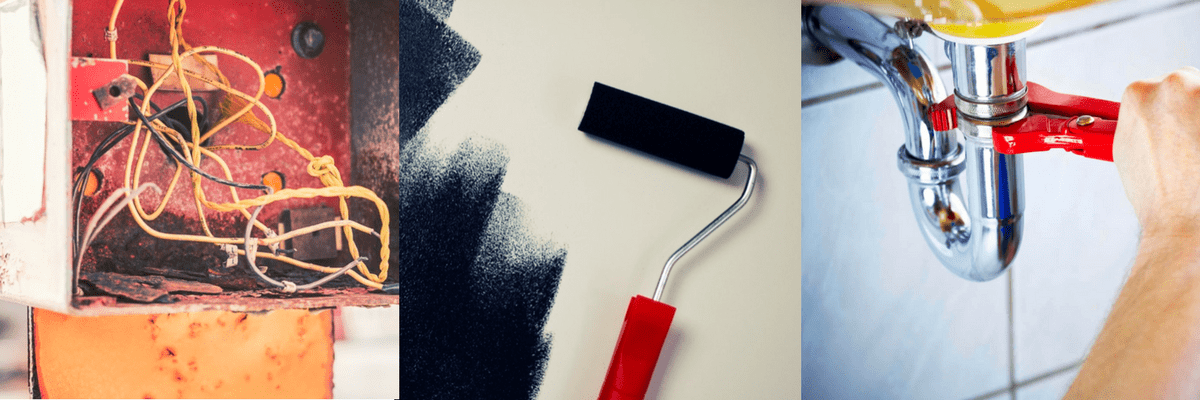
Repairs You May Need An Expert For
- Re-roofing/ roof restoration
- Plumbing
- Tiling
- Large painting jobs
- Home styling (if you don’t have a knack for interior design)
- Professional landscaping
- Building and pest inspector
- Carpenter or cabinet maker
- Electrician
3. Start obtaining quotes from the experts
Going by referrals, personal experiences or great reviews, start approaching different professionals. Many offer free measure and quotes or will give you a ball park figure. This is where those images come in handy! Don’t forget to communicate your time frame and the level of urgency for the job. That way, the landscaper, tiler or plumber knows exactly when it needs to be completed.

Not sure if you need a building or pest inspection? There may be some underlying structural issues that you couldn’t pick up in Step 4. Chapter 7 covers everything you need to know about building inspections.
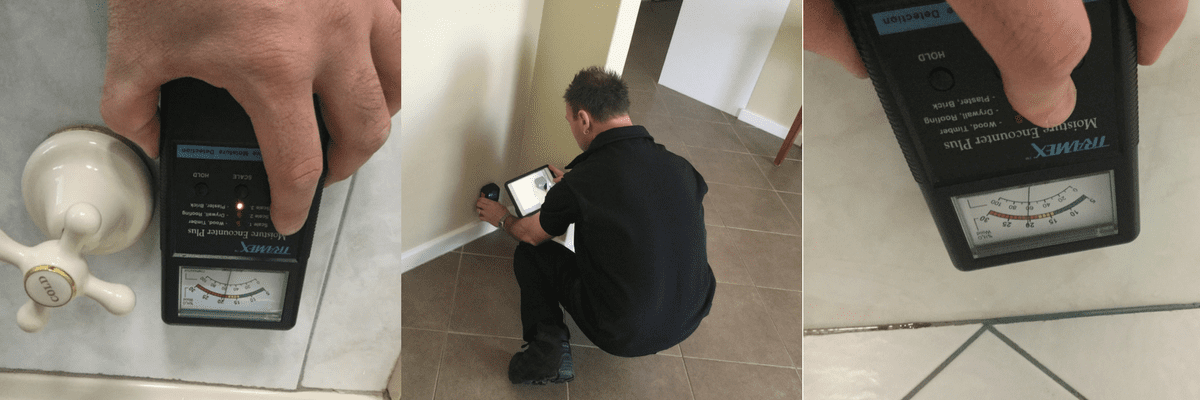
Having your home inspected for structural or pest damage can be to your advantage when prepping your home for sale, especially for older properties where some buyers exercise more caution regarding the integrity of the structure.
It also gives the new buyer piece of mind knowing that the house has been check recently.
A Building and Pest Inspection may help uncover any issues below the cosmetic surface of the property of which you were not previously aware. Issues, which could impact on the sale of your property or give a prospective buyer the change to negotiate the price down if found after the house has been put on the market.
A forward thinking approach in this area ensures that the power remains in your hands during the selling process and affords you time to take control of any issues that may be lurking below the surface. In addition to the above, this can demonstrate to potential buyers that you have nothing to hide from them about the condition of the property and can in turn, protect your sale price and potential profit.
If your house has never undergone a building or pest inspection, you might not know what to expect.
TIP: Be cautious of unlicensed inspectors. When looking for an inspector, ask what qualification they have.
What is a Building Inspection?
A building inspection in Adelaide will check your home (inside and outside) for any damages or underlying issues. They should produce a ‘vendor report’ that states any repairs or issues.
The building inspector should check for the following defects; roof exterior, roof void, under the subfloor, interior/exterior, garages, car ports, sheds, retaining walls, fencing and drainage.
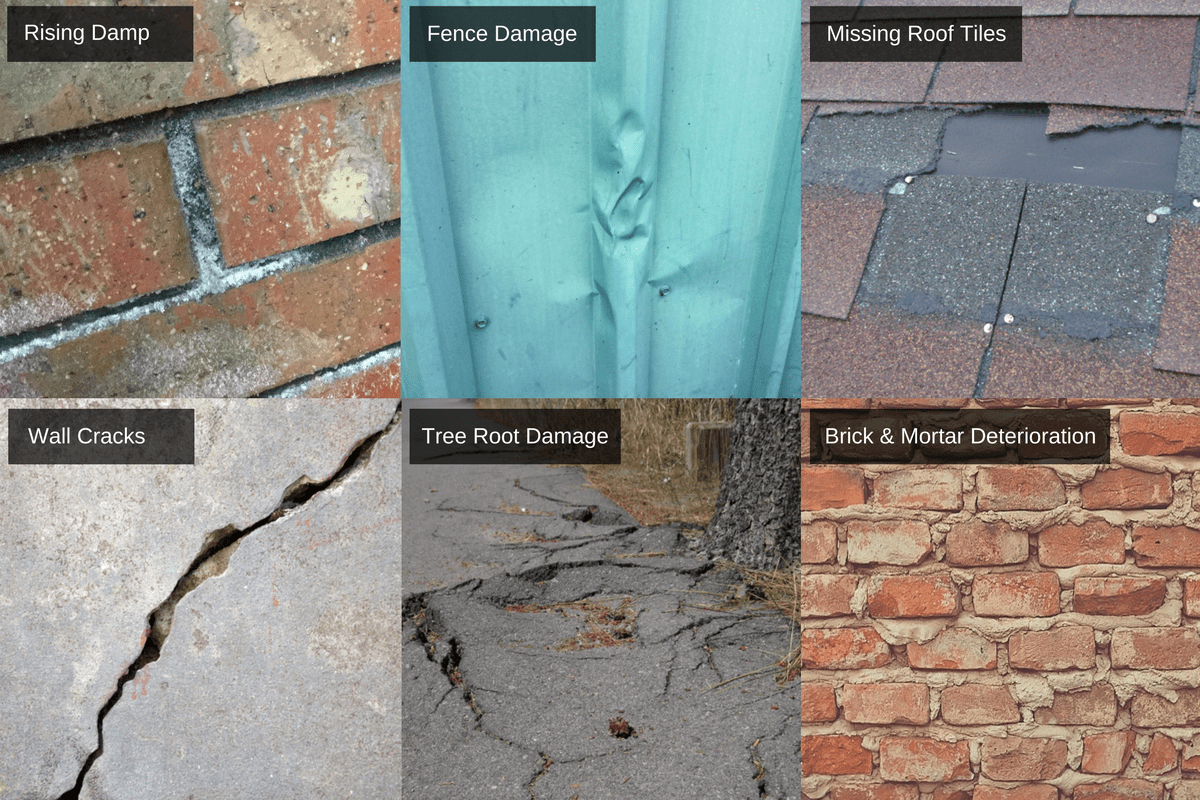
Some of the most common building defects found in a building inspection are:
- Dampness issues
- Termite infestation
- Fire hazards
- Poor external surface drainage
- Damaged roof sheets or tiles
- Safety switches
- Leaking showers or baths
- Smoke detectors
- Major and minor wall cracks
- Subsiding foundations
- Defective gutters
- Decayed boundary fences
- Tree root damage
- Safety and electrical hazards
- Bouncy and uneven floors
- Leaking hot water units
- Active water leaks
- Salt Damp
- Brick and mortar deterioration
- Subfloor ventilation
- Damp proof course
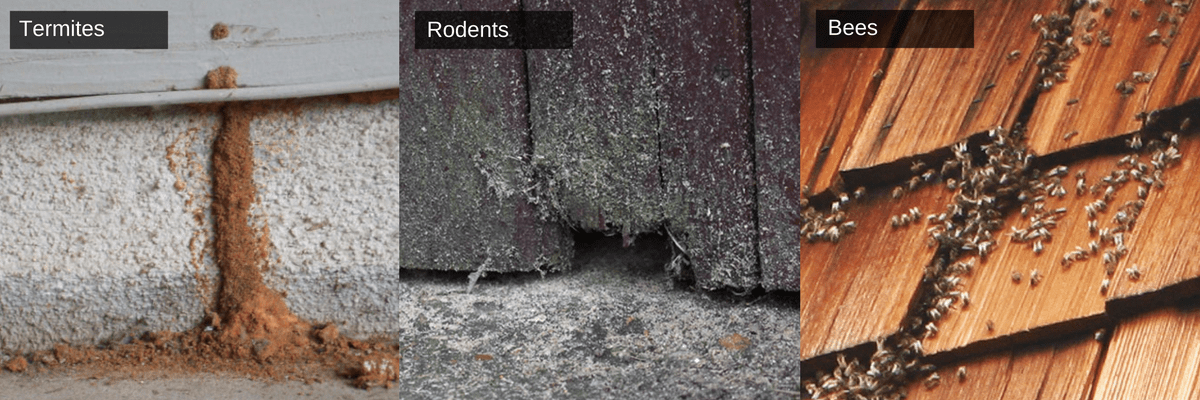
What is a Pest Inspection?
A pest inspection (also known as a ‘Timber Pest Inspection’ is highly recommended in the early stages of house selling. Any hidden structural issues will need to be addressed so there are no hidden surprises for the next buyer. Timber pests
Timber pests include: termites, wood borers and wood decay fungi (wood rot). Timber pests are quite common in properties that contain timber elements. A good inspector will also notify you of any traces of rodents found on the day.

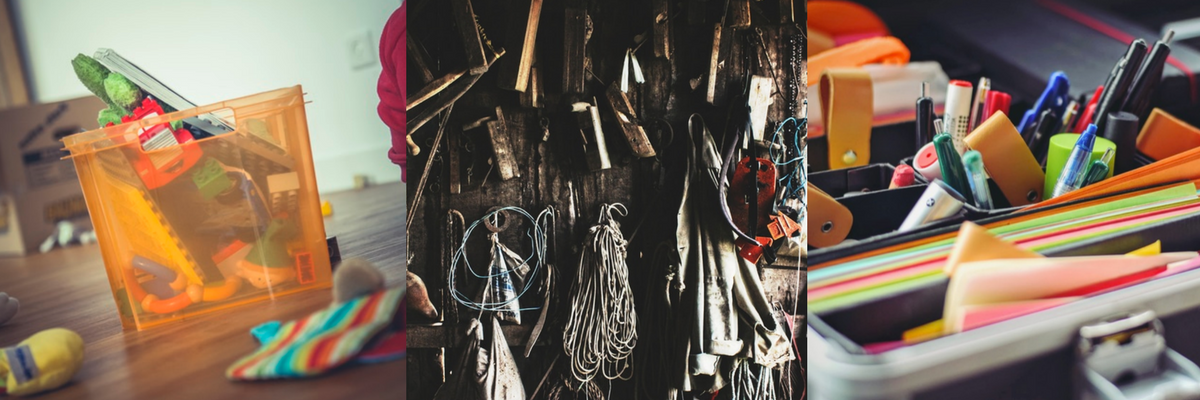
Sell, Donate and Declutter
Step 8 covers methods to break through any hoarder-like behaviour and remove any possessions or furniture that doesn’t have a purpose.

It’s time to become a minimalist. Start getting rid of everything around the house that you’ve not used in the last 12 months.
Remember, not only are you selling your home, but you will also be moving, nobody wants to move their collection of newspapers from the 70’s if they don’t have to.
While working through this step, consider how you will be styling your home for your photos (see step 12).
Divide your possessions
1. Keep
These items are your most loved possessions or functional items that you will proudly make room for in your new home.
2. Sell
This process doesn’t have to be time-consuming. Simply gather everything you want to sell, take some pictures and upload them to Gumtree, Ebay or local buy, swap and sell Facebook pages. Whatever doesn’t sell within the first week, donate.
3. Donate
This also goes for items where you have doubles or if they are still in good condition. Choose your favourite charity op shop and know that your once loved possessions are going to a new home.
4. Bin
Anything that is broken, damaged or doesn’t really serve a purpose, needs to be tossed immediately!
5. Grey area…
Lots of sentimental (but practically useless) items?
Consider taking photos of them and letting go. You’ll have a reminder that they existed but won’t be carting it from home to home. Another grey area might be random items like tools, stationary or seasonal clothing. Box these up and if they don’t find a home in your new dwelling or friends and family can’t find
Box these up and if they don’t find a home in your new dwelling or friends and family can’t find use for them, consider throwing or donating.
Ask yourself the following questions:
- Does your furniture reflect potential buyers?
- Will you be stripping everything back for the photos or will you be hiring a pre-sale home dressing agency?
- Do you have anywhere to store the possessions and furniture that you will be keeping for your next home? If you do, we suggest storing them so they are out of sight so you can focus on the task at hand.
EBay, Gumtree, a skip, these are all your friends when it comes to de-cluttering your cupboards, rooms and shed when prepping for sale. If you are feeling overwhelmed with what to do with all of your things, we suggest breaking it all up in to sections. Take a similar tact as if you were cleaning out your closest.

Step 9 is a gentle reminder to keep on top of your usual home maintenance. We promise, this will stop things getting overwhelming towards the end.
Stay on top of your usual routine around the house. Letting things go will only add to your stress levels, which may start to build at the final day approaches!
If word gets out that you’re selling, you never know who will be popping their head over the fence to suss it out.
1. Work through our regular maintenance checklist for ensuring your home stays in great condition
- Lawns
- Weeds
- Floors
- Dusting
- Mirrors
- Dishes
- Surface areas
- Grouting
2. Tips for how to perform regular maintenance on your property

Ensure The Outside Of Your Home Looks Fantastic
The outside of your home is what the world sees everyday. Step 10 lists to key areas you need to pay attention to.
The front of your house should be immaculate; this is the first thing a buyer will see on approach.
Also, don’t assume the buyer hasn’t done a drive by during the week.
Key areas to focus on outside:
- Check your fence if you have one for any signs of damage, cosmetic wear and tear; address this sooner rather than later.
- Double check the gutters for leaks, rust and also any sagging that may be a sign of damage.
- Lawns – keep them high and mow them regularly, water it as need be and treat weeds as they arise. Remember the drive by that may happen leading up to the sale.
- If you have a front garden, keep the plants and shrubbery trimmed and looking neat.
- If you have an irrigation system, ensure that this is clean and fully operational at all times.
- Paint and exterior – do any touch ups required as you find them. Even the most cautious of eyes can miss things the second time around.
- Cut back trees that are overhanging near the roof or and power lines on the property, or bring in a professional to do so as this can be tedious work.
- Check the outer walls and particularly around windows for any cracks, leaks, build up of mould or mildew or any water stains.
- Check your roof for any damage, cosmetic or otherwise.
- Ensure any concrete or paved areas are sealed properly to prevent cracking or weakening.

Cleaning The Inside Of Your House – How to Get The Inside Ready for the Inspection
Congratulations! This is the final step of the cleaning, fixing and maintaining of your home. Step 11 highlights everything that needs to be cleaned inside the home so it’s ready for inspection and Step 12.

Now that you’re outside is looking pristine (or on its way) take the time to start in one room and work your way through the house, cleaning it floor to ceiling.
List of What Needs To Be Cleaned Inside The Home
- Smoke detectors – don’t wait until they start beeping (for battery operated devices). Ensure they are working and as a tip, use a match with real smoke, don’t just hit the test button. Ensure the match is fully extinguished upon completion.
- Dishwasher – clean and disinfect it by running a wash when it is empty. How to clean your dishwasher –> Read here (Pro Tip: Bi-carb soda and vinegar in the detergent compartment will work wonders.)
- Clean your whole house with vinegar, baking soda and lemon –> Read here
- Clean the oven, cooktop and exhaust fan and filters if applicable.
- Check taps and plumbing for signs of leakage and get repaired if need be.
- Check for any loose or damaged door and draw handles.
- Dust and vacuum the tops of cupboards – a savvy buyer will check here!
- Clean all light fittings, skylights and ceiling fans if applicable.
- Ensure all lights in your property, both inside and outside are in good working order.
- Check doors and windows for cracked seals and or peeling paint and repair as you discover them.
- Clean all tracks for windows and sliding doors.
- Wash all windows – both sides – in and out.
TIP: Cleaning with newspaper and window cleaner leaves zero streaks or marks.
- Clean all curtains and blinds – make sure you read the individual instructions for washing.
- Clean and vacuum under furniture that you would not normally move, a savvy buyer may move it during an inspection to check the condition of walls and flooring.
- Remove any furniture, which does not need to be there – DE-cluttering is key here!
- Do what you can to make any storage areas appear large and bright. Take note of the light bulb strength in these areas and increase the wattage if the area seems dull.
- Keep only current season clothing in view in wardrobes; this will make your robes seem more spacious, and remove any bits and pieces stored on the floors in wardrobes.
- Hang air fresheners

Take Photos That Will Sell Your House
You are so close to the end! Photos can make or break a home in the eyes of a potential buyer. This step breaks down how to prepare your home for photography.

Preparing Your Home For Photography
When your home is in a pristine state of cleanliness and order, it’s time to capture this moment in photographs. It is both an art and a science portraying your home in photos so that when buyers are browsing online or via print media, your pictures beg them to take a more in depth look! In a lot of cases, the photographs of your property are a potential buyer’s first contact with your home, so you cannot afford to skimp on price or detail in this component of the selling process.
Remember too, that how your home looks in the photos, is exactly how the buyer will expect it to look at the first inspection. A good tip here is to make copies of the photos you are using in your advertisements and keep them in each room shown, so you know exactly where everything is in the picture. This is likened almost to resetting a set on a movie for continuity purposes. The most astute buyer will often walk around a property in an inspection with either the live advertisement on their mobile or other device, or with the printed pamphlet obtained on the day or before from the agent.
Excellent photography can hook a potential buyers emotions from the second they see the pictures, leading them to imagine what it feels like to be inside your home. Ensure that you marry up this initial impression with the feel of your home on inspection day.
Below is a checkpoint list to ensure all of your bases are covered when it comes to getting your home ready for its photo shoot.
1. Look Through the Lens of a Camera
Sometimes through the camera, helps you see things you didn’t see before. Take a few snaps and see if there is anything that can be taken out. Remove anything and everything that does not serve a practical purpose, inside and outside of your home. Cleanliness is a must, this shows prospective buyers that you care for your home and sets the tone for its future.
2. Tailor Your Presentation To Your Ideal Purchaser
If you decided this is going to be a family home, decorate the kid’s bedrooms with posters, maybe a school bag and shoes, laid out in a tidy manner. If you’ve decided you are targeting a single professional, maybe seek out a bicycle to mount on a wall, or tasteful magazines that show that you are looking for a buyer who is in charge of their own destiny. Single professionals are often drawn into a space that they can almost just walk into tomorrow without needing to change, create an image here of the perfect dwelling to retire to of an evening.
Questions To Ask Yourself About Your House?
- Is this a family home?
- Is it child-friendly?
- Is it a professional couple type dwelling?
- Are you targeting a single person?
- Is this a first home buyer’s property or an investor seeking to expand their portfolio?
Once again put yourself in the shoes of who you would want to own your property in the future and try so imagine if it is meeting your needs.
Leave no stone unturned.
3. Your Home Is Your Book, And It Will Be Judged By The Cover

Research has shown that most buyers, women in particular make up their mind in the time it takes between getting out of their car and walking through the front door. We are talking about a 30-60 second window here. Once again, emphasis must be placed on the photos matching the reality here.
Dust all cobwebs and rid the property of any peeling paint and grime. Sugar soap is your friend here, ensure you have plenty on hand! Photos should highlight the strengths of the property, not the weaknesses. Re-visit the earlier part of this guide and make sure your front yard is freshly tended to. There is no need to get the scissors out on the lawn but a fresh cut makes all the difference.
Make sure all pathways are clean and free of weeds, dirt or stains. Trim all hedges, trees and shrubbery. It is a good time to re-visit your earlier decisions of where you chose to spend time and money on cosmetic touch ups. Verandas and entry points – The same rules apply here as the rest of the house. Rid the area of anything that does not serve a practical purpose. Less is more when it comes to the flow of the entry point to your home.
4. Bedrooms – How to Get Your Bedrooms Photo-Ready
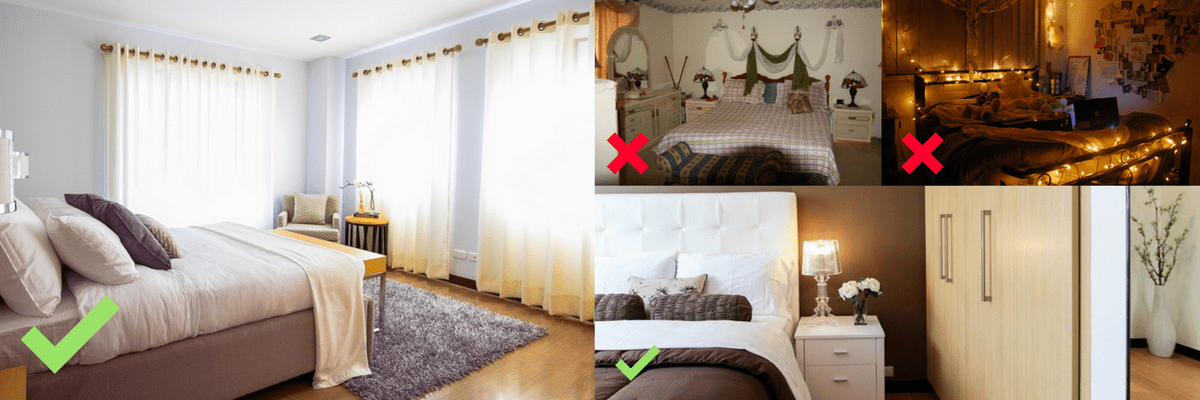
It is common that a person uses their bedroom to express their identity. Once again, less is more so that you can provide a blank canvas for potential buyers. Fresh crisp sheets, beds made to hotel standards.
Remove all unnecessary clutter and electronics particularly.
Capitalise on bedside lamps and leave these on during an inspection and in your photos, the glow of a bedside lamp paints a picture of rest and relaxation at the end of a long day.
TIP: Enhance your bedroom with artwork.
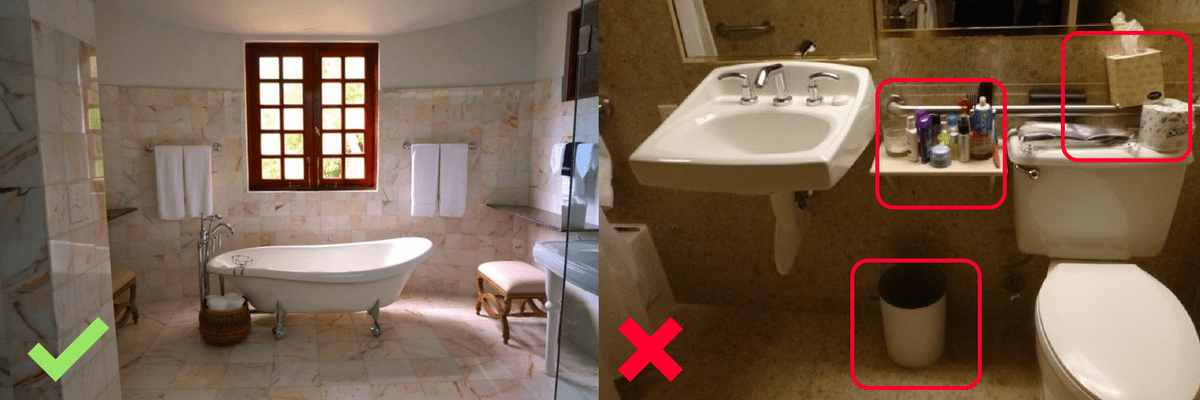
4. Bathrooms – How to get your bathrooms photo-ready
Bathrooms can be a challenge as they are often a high traffic area. However, we all know that deeply satisfying feeling of a freshly cleaned bathroom, this is what we are going for! Going for an almost clinical feel is what we want in the bathroom (s) of your home. Seek a professional cleaner if you feel you should. They will work to a set list and target the areas often forgotten during the weekly clean.
Bathroom Checklist:
- Polished mirrors
- Polished glass
- Gleaming toilet
- Little if any personal items visible
- Think display home here
5. Living Areas
If you are fortunate to have a nice view through your living room windows, capitalise on this in your photos. Ensure your windows are cleaned thoroughly. You should not be able to see glass, only what is stuck to it or the marks from dirty hands. It should be crystal clear.
If you are styling your own home, try keep the living area as minimal as possible. Ensure that cushions match, items are neatly placed on shelves and floors are immaculate.
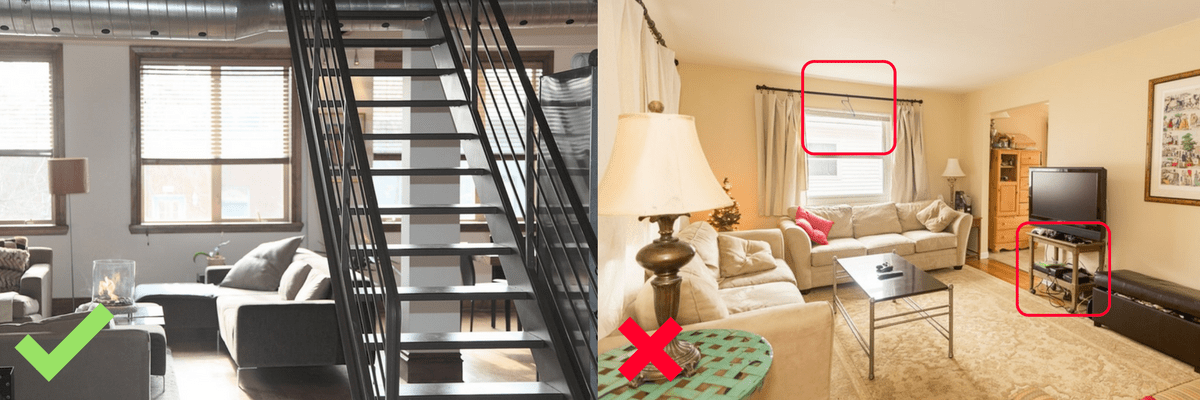
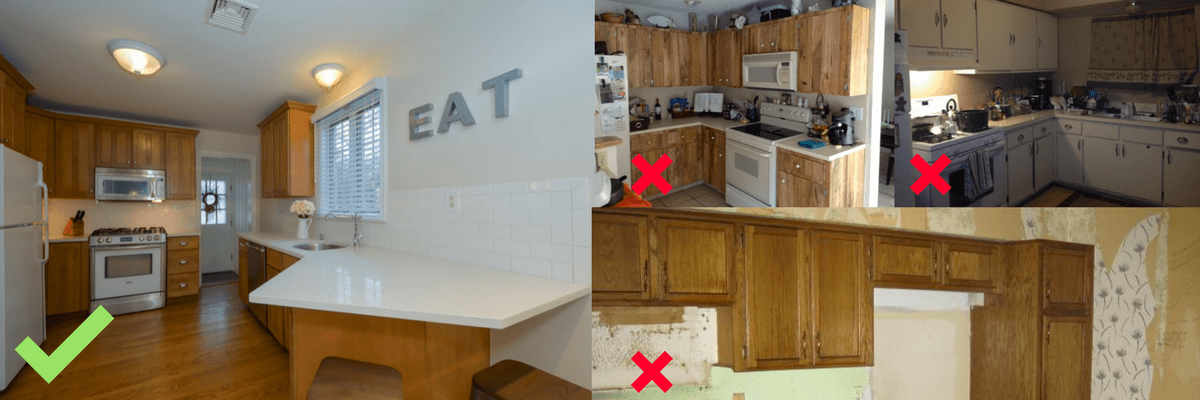
6. Kitchen
Have only what needs to be out in the kitchen out. The fridge should be the fridge, not a pin up board of what needs to be done that day. Remove all personal items and create a generic workspace. A fruit bowl however or fresh flowers go a long way in this space.
CLEANLINESS – This is a food preparation room and one that must show an emphasis in hygiene. Remove any pet food bowls, rubbish from the bins and particularly dirty dishes from the sink.
7. Pools
If you have a pool, make sure it sparkles in the photos and in real life. Ensure all cleaning products and tools are stowed away out of sight, kids toys etc.

8. Entertaining Areas
You want to paint a picture here tailored to your ideal buyer. If you are appealing for the family with an active social life and zest for entertaining, emphasis this in your layout. Keep your outdoor setting clean and free of clutter, make sure the BBQ is also in pristine condition. If you have an outdoor TV, maybe a shot of the football on screen will give the buyer a glimpse of how a Saturday afternoon at home can look and feel!

9. Replace All Faulty Light Globes – Inside and Out
Most of us are guilty of neglecting blown lights for days, weeks, and months on end. This is not a good idea at all during the selling phase. It can in fact show a neglectful attitude towards ongoing maintenance and may lead potential buyers to start digging for other signs of neglect. This can literally cost you money, in lost sales, and more inspections than necessary. Treat this like you have one shot.
10. Lights! Camera! Action!
In the most literal sense, even when shooting during the daytime, keep the lights bright and on at all times.

And that’s a wrap.
Work through our regular maintenance checklist for ensuring your home stays in great condition
- Lawns
- Weeds
- Floors
- Dusting
- Mirrors
- Dishes
- Surface areas
- Grouting
Now that you have done all you can to make sure your house is ready for sale, it’s time to allow your chosen real estate agent to take the reigns. Your agent will help you make the right choice on how to sell your home whether it be auction or private sale. While the house is on the market, ensure that the property is maintained and checked regularly after viewings or open house inspections.
Thank you for enjoying our guide to selling your home! If you found this post useful, we would appreciate it if you could share on social media.